WordPress in a Subdirectory on its Own Server

WordPress, the enormously popular Content Management System, is supported by a collection of tools and practices aimed at enhancing its security. But secure is a relative term and while those tools and practices can help make WordPress more secure than its default installation, cybersecurity professionals still cringe at the thought of using it on high-security sites. Fortunately, when such sites need to publish a blog, all is not lost as it may run on a dedicated server, yet still appear to be in a subdirectory of a main site.
Article Objectives
- Provide an overview of why and how to publish a blog using WordPress within the context of a larger site powered by some other technology. (This article uses a blog as an example, but the content could be anything you wish to publish using WordPress.)
- Provide step-by-step instructions on how to set up this architecture yourself.
Role of WordPress in a high-security website
WordPress is mature and usually easy-to-use. Because even high-security websites may need to publish a blog, this can make it a very appealing tool. How then may we utilize it without without jeopardizing stringent security requirements around a larger system? Using the approach detailed here means that should the blog ever be compromised:
- The blast radius is contained and does not spread to other parts of a larger system.
- The blog can not be used as a point of egress into a larger system.
Assumptions
This article assumes:
- the solution is being built on Amazon Web Services (AWS) and will reference some AWS services by name. However, the concepts presented are applicable for any cloud hosting provider.
- the reader has some basic familiarity with executing Linux commands as that will be necessary to move some WordPress files around from their default installation directory.
- your current system architecture sits behind an Application Load Balancer (ALB). As explained later, the ALB is used to direct requests to a dedicated WordPress server. Provisioning an ALB is beyond the scope of this article though there will be some instruction provided on how to configure some rules for an ALB.
- you do not already have a blog running at your website, or if you do, it is at least not already running at a subdirectory named blog. If that is the case, then in every point in the instructions that follow where you are instructed to name something blog, you may want to substitute dev-blog instead. The reason is that once you create a rule in your ALB to begin directing all traffic for the blog to your new server, it will do just that. If the new server has not yet had existing blog content migrated, bad things will happen. You may instead use dev-blog during the setup, development, migration, and quality assurance of this whole process until you’re sure everything’s ready. Once it is, you then change all references to dev-blog to be simply blog for the launch of your new architecture.
The Architecture Overview
It is common for blogs to live in subdirectories. For example:
https://www.domain-name.com/blog
In the example above, blog is a subdirectory as opposed to a subdomain which might look like:
https://blog.domain-name.com
Subdirectories are preferred in the interest of search engine optimization because blog content is then seen as belonging to the larger website rather than being a totally different website of its own. Therefore, blog content both contributes to the domain authority of the larger site while simultaneously benefitting from it.
Very often when WordPress powers just a blog rather than an entire website, it is installed into that subdirectory. In our example from above this means that instead of placing the WordPress core files into the root directory of the website, those files will be installed into the blog subdirectory. And that means the entire server is potentially exposed to any vulnerabilities that might be associated with WordPress. Associated in this context could mean WordPress itself, or a WordPress theme or plugin, or even in the underlying PHP language that powers WordPress.
A more secure approach is to install WordPress on a totally different server we’ll call the blog server. This blog server could be in some private subnet of your main Virtual Private Cloud (VPC) or even further isolated from the system by being placed into its own VPC wherein you would create a totally new VPC; provision a server in that VPC; install WordPress and its dependencies (MariaDB and PHP) onto that server.
We’ll use a simpler method to create our blog server, Amazon Lightsail. Lightsail features pre-configured WordPress machine images that have everything needed already installed. The people behind these images—Automattic (the makers of WordPress) and Bitnami—have also put some security configurations in place on these machine images which is very welcome given our security concerns.
At this point you may be wondering, “Wait, this article is titled WordPress in a Subdirectory…. How can it be in a subdirectory if it’s on a totally different server?” The answer is that it only appears to be in a subdirectory when visiting the blog in your web browser. What goes on behind the scenes is that an Application Load Balancer (ALB) captures and inspects all requests before deciding which server to direct the request to. Let’s again look at our example URL:
https://www.domain-name.com/blog
In that example, blog is a subdirectory, but it’s also the path part of the entire Uniform Resource Locator (URL). And so far it’s the entirety of the path, though it’s possible other things could come after it which would also be considered part of the path. When the ALB detects that the path of a request starts with blog, it directs that request to the blog server and all other requests go elsewhere. Lightstail instances live in their own VPC so by simply using Lightsail, our blog server is instantly provisioned into its own VPC isolated from our primary VPC where the bulk of the system resides. We do however need to enable VPC peering from within the Lightsail interface in order for the ALB to direct requests to it. At the time of this writing, that means the Lightsail instance must be provisioned in the same region as the default VPC containing the ALB. There is a thing called cross-region peering when working with VPCs you create manually, but that does not work right now with Lightsail so we need to make sure to provision a Lightsail instance in the same region as the VPC containing the ALB.
The following diagram demonstrates this architecture.
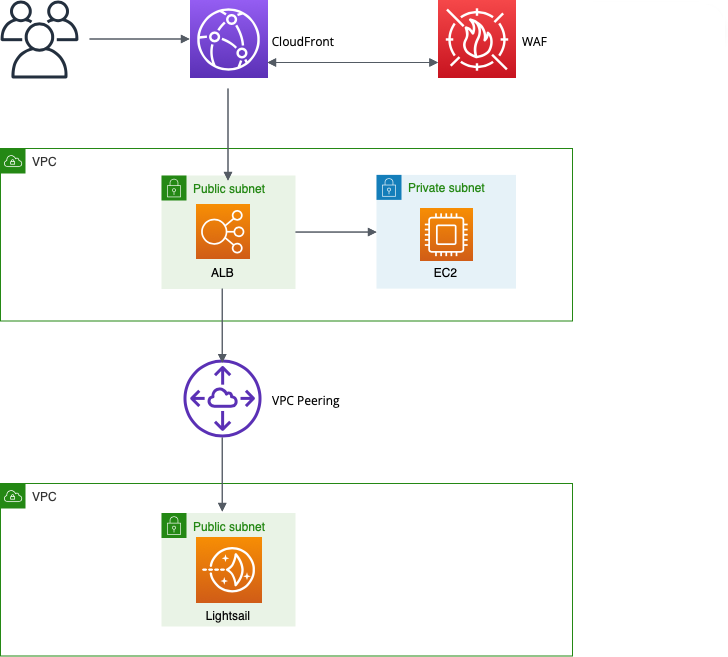
What is not shown in the diagram are the security group rules. In the Lightsail console we permit only two types of incoming traffic.
- Allow traffic on port 22 from the browser-based terminal built into the Lightsail console.
- Allow traffic on port 80 from the ALB.
Notice there is no firewall rule allowing traffic directly to the blog server across the Internet by requesting the instance’s public IP address. Lightsail instances are assigned a public IP address at launch but we prevent submitting requests to it by configuring a minimal pair of firewall rules to ensure the blog server only receives traffic from the ALB and not directly to its public IP.
Notice one other thing. We only allow traffic on port 80 and not 443–the port typically used for traffic encrypted over HTTPS. That’s because traffic to the ALB is already encrypted, or should be with a TLS certificate attached to CloudFront (see diagram above), and when the ALB sends requests to the blog server across a VPC peering connection that traffic is already encrypted internally. See Encrypting Data at Rest and in Transit for more about that.
Step-by-Step Instructions
The above is a high-level overview of the architecture. At the detail level there is a little more to it so if this is the right solution for you, what follows are the step-by-step instructions for setting this up in your own environment. There is a lot here so take a deep breath, read slowly and carefully and take your time.
- Provision a Lightsail instance. If you’ve never done this before, it’s as simple as visiting the Lightsail console of your AWS account and clicking the Create instance button, then following the on-screen prompts. You will see that Lightsail makes available several blueprints. These are machine images with everything you need already installed. Choose the WordPress blueprint; select a server size appropriate for your workload; give it a name; click Create instance and wait while it provisions everything for you.
- Establish VPC peering between the Lightsail’s VPC and your main VPC. Official documentation is available at Set up Amazon VPC to work with AWS resources outside of Amazon Lightsail, but the process is as simple as starting within the Lightsail console, and then:
- Go to the upper right-hand corner of the screen and select your username, then choose Account.
- On the account screen, select the Advanced tab.
- Select the region containing your main VPC. Remember as stated earlier, at the time of this writing it is necessary for your Lightsail instance to be in the same region as the VPC you wish to peer with. Once peering is established, you will see it back in your default Amazon VPC management console under the Peering connections link.
- Move WordPress core files from their default installation location to a subdirectory. The official documentation for this is at Giving WordPress Its Own Directory. Frankly it’s not written particularly well and it also talks about editing the htaccess file which is not at all necessary. Fortunately the folks at Delicious Brains have provided excellent documentation at Installing Your Site in a WordPress Subdirectory, so we’ll take advantage of what they’ve provided. The section of that documentation we’re most interested in comes under the heading, Manually Configure a Subdirectory Install. On a Lightsail instance, the process is as follows:
- Starting in the Lightsail management console’s home screen, click the Connect icon for your instance. (It will be the little orange icon showing >_.) This opens the browser-based terminal.
- In the terminal type ls and click return. (For those new to Linux commands, that’s the lowercase letter L followed by the lowercase letter s. Think of it as a shortened form of the word list because that’s what it does, lists the files in that directory.) While it is subject to change in future machine images available through Lightsail, what you’ll currently see returned from the ls command is the following:

- Let’s look inside the stack directory. At the command prompt in the terminal, type:
cd stack. This is the command to change directory to the stack directory. - Once inside the stack directory, again enter the ls command to list its contents and you will see another directory named wordpress. This is the directory configured as the root directory for the website on this Lightsail instance. (I reiterate that the directory structure follows this pattern at the time of this writing. Lightsail machine images in the future may follow a different pattern in which case you will need to do some experimenting to identify the root.) This is also the directory that serves to house all of the WordPress core files. These are the files that we will need to move.
- Create a directory inside the wordpress directory named blog. Do this at the command prompt at your terminal by typing mkdir blog and then hit return. Remember that we are treating our blog as a subdirectory of a larger website. Therefore, we want the directory structure on this server to reflect that even though there is no site being served by it at the root level. This is the first part of step two in the instructions provided by Delicious Brains.
- The second part of those instructions requires moving all the WordPress core files into the blog directory you just created. The command for doing that is: sudo mv !(blog) blog. Using sudo at the start of this command may, or may not, be necessary (it just elevates privileges), but the rest of the command says to move everything in the current directory (that being the wordpress directory) to the blog subdirectory with the exception of the blog subdirectory itself—because we can’t move something into itself. Once complete, run cd blog at the terminal to move inside the blog directory and then run an ls command to view its contents. You should see what is in the image below.

- In the move operation performed in the previous step we moved a file named index.php into the blog directory. (It’s the first file listed in the image above.) We now need to copy that file back into its original location. Be sure to copy, and not move, this file.
- We now move up one level in the directory hierarchy. This puts us back into the wordpress directory which should now contain only two objects. One is the blog subdirectory, the other is the index.php file.
- We need to make a small edit to index.php. For those following along with the Delicious Brains documentation, this is step four. We’ll use the nano text editor to make this edit so at your command prompt type nano index.php.
- Move the cursor down to the last line which includes the wp-blog-header.php file and add blog/ to the start of that line. The finished line of code will look like:
require __DIR__ . ‘/blog/wp-blog-header.php’;
Save this change and close out of nano. - At this point you may ignore the final step of the Delicious Brains documentation. As they point out, we do indeed need to make a configuration change, but because we’re using a machine image provided by Lightsail, we have to go about it a little differently than what they describe. From the command prompt, change directories to go back inside our blog directory.
- Once inside the blog directory, we will edit wp-config.php. Again using nano, type, nano wp-config.php. This opens up the WordPress configuration file. Be very careful editing this file but do scroll down to the section that contains the following lines:
define( ‘WP_HOME’, ‘https://’ . $_SERVER[‘HTTP_HOST’] );
define( ‘WP_SITEURL’, ‘https://’ . $_SERVER[‘HTTP_HOST’]);
I like using hardcoded values here rather than the dynamic $_SERVER variable so make these two lines look like the following, using your own domain name of course. Notice the domain includes the blog subdirectory at the end.
define( ‘WP_HOME’, ‘https://www.my-website-domain.com/blog’ );
define( ‘WP_SITEURL’, ‘https://www.my-website-domain.com/blog’ );
Save your changes and exit out of the terminal.
- Configure firewall rules in Lightsail. This begins with retrieving the IP addresses of the ALB so follow these steps:
- Visit the EC2 management console and click Load Balancers in the left-hand navigation.
- Copy the name of your load balancer.
- Click Network Interfaces in the left-hand navigation.
- Paste the name of your load balancer into the search field at the top of the network interfaces page. This filters the list of network interfaces down to only those associated with the load balancer.
- Scroll over to the column labeled Primary private IPv4 address. Open a new tab in your browser for the Lightsail management console.
- In the Lightsail console’s home page, click your instance’s name, and then ensure the Network tab is selected. You may need to scroll down the page a little bit to the IPv4 Firewall section.
- We will have only two rules here. One for SSH traffic, the other for HTTP. An SSH rule should already exist, but let’s ensure it’s probably configured. Click to edit this rule, and then select the checkboxes for:
- Restrict to IP address.
- Allow Lightsail browser SSH.
- Beneath these checkbox is a field to provide an IP address, but leave this blank. Using this configuration, we limit SSH connections to only the Lightsail browser SSH terminal which is what we want.
- You may need to add a rule for the HTTP rule. If so, go ahead and do that selecting HTTP in the Application field.
- Select the checkbox to restrict HTTP traffic to select IP addresses.
- Back in the browser tab for the EC2 console, copy one of the IP addresses associated with the ALB and paste into the Source IP address field for the Lightsail firewall rule. There should be at least one other record in the EC2 console for the ALB, so you will need to add another IP address to your firewall rule and click Save.
- To summarize, there should be only two rules. An SSH rule restricted to the Lightsail browser only. Plus an HTTP rule restricted to only the ALB on port 80. That’s it.
- We now move our attention to the Application Load Balancer. (Remember that this article assumes an ALB is already in use and you have at least some minimal configuration already in place.) Visit the EC2 Management Console in your AWS account and then click Target Groups under the Load Balancing heading in the left-hand navigation.
- Click Create Target Group.
- At the Specify Group Details page, make the following selections:
- IP addresses as the target type.
- HTTP as the Protocol.
- IPv4 as the IP address type.
- the VPC that hosts the load balancer.
- HTTP1 as the Protocol version.
- any desired health checks you may wish and click the Next button to advance to Step 2.
- At the Step 2 screen titled Register Targets, make the following selections:
- Under network, choose Other private IP addresses.
- Paste the private IP address of the Lightsail instance (you may need to open a separate browser tab and visit the Lightsail management console to copy this) into the field labeled Enter a private IP address.
- Click the Include as pending below button.
- Click the Create Target Group button.
- Return to the Target Groups page and find the newly-created target group. Select and associate it with the ALB you wish to use.
- In the EC2 management console, click Load Balancers in the left-hand navigation, then click the name of the ALB being used here.
- Ensure the Listener and rules tab is selected, and click the listener being used. At this page we will create a new rule so click the Add rule button to enter the add rule wizard. As you move through this wizard make selections as follows:
- Step 1, give your rule a name. Blog would make perfect sense and click Next.
- Step 2, define rule conditions, click the Add condition button, then for Rule condition types choose Path. For the value of the path, enter /blog and click Next.
- Step 3, define rule action, select Forward to target groups then select the target group you created previously and click Next.
- Step 4, set rule priority, specify a numeric value for when this rule should execute among all your other rules and click Next.
- Step 5, review and create, permits you to do exactly that. Review the selections you’ve made and create your new rule. At this point, your ALB will begin directing requests to the blog server. As stated earlier under assumptions, make sure you’re ready for this to happen since if you have an existing blog on your website, it will no longer receive requests once traffic begins to be directed to new blog server. That blog server needs to be populated with content and quality assured before actual users start going there.
- Our architecture configurations are now complete and it’s time for the fun part, creating content! The WordPress admin may be accessed at:
https://www.domain-name.com/blog/wp-admin/
Anyone already familiar with Wordpess will recognize the wp-admin in the URL, but it is commonly found immediately after a domain name. In this case, because we’re running it at a subdirectory, it’s comes after the blog subdirectory name, but you are ready to go there and log in using the WordPress username and password that may be retrieved through the Lightsail interface.
Using CloudFront
While not necessary, you may pass your website through the CloudFront content distribution system as doing so can greatly speed up your website. The definitive reference for how to configure CloudFront for WordPress may be found at How to Accelerate Your WordPress Site With Amazon CloudFront.
Using Web Application Firewall
It is recommended to utilize the Web Application Firewall (WAF) to further enhance the security of your website. AWS makes available three sets of rules they manage to guard a WordPress site.
- WordPress application managed rule group. Yes, AWS makes available a rule group containing a set of rules that block malicious requests specifically targeting the WordPress application.
- Linux operating system managed rule group. Because your Lightsail instance is on a server using the Linux operating system, you should also utilize this rule group.
- PHP application managed rule group. WordPress is written using the PHP programming language, therefore you should utilize this rule group.
There are also a number of other rule group that you should use including the core rule set managed rule group and the SQL database managed rule group. You may learn more about all of these managed rule groups at AWS Managed Rules rule group list.
Enable Multi Factor Authentication
It wouldn’t make much sense to go to all this trouble only to leave the WordPress admin protected with only a password. Set up Multi Factor Authentication (MFA) to add an additional layer of protection. This does require installing a plugin so find one you like. Some popular options include Rublon, DUO and miniOrange.